Ever Imagine That Ur Android Can Run Both ANdroid + WIndows Both

Due to increment in ANDROID PROCESSOR and available RAM
It has became true to run both "ANDROID AND WINDOWS" in Ur Android only!!!
So-get ready to make your "SM@RT ANDROID" More Smarter
What Will U Require????
1.Qtemu Virtual MAchine2.SDL.zip
3.Window Emulator For Android
And Finally
4.Image of the OS-which you need to install...
1.Qtemu Virtual Machine
First Of All Why Qtemu Virtual Machine??
-Its Capable Of Making Blank Disk Img
-Size is To Small
-Run ON Qemu
Short Review...
It is pretty comprehensive and has a GUI for creating new Qemu virtual machines and running existing ones. If you're not particularly a fan of meddling with the command line all the time, but still want to use Qemu as your virtualisation solution, QtEmu is an invaluable tool.It does differ slightly in the way it works from previously covered Qemu Launcher and it does appear less cluttered and more like the interface of commercial solutions such as VMware.For example, the VM detail screen has a start and stop button near the top and then individual section buttons below which allow you to change individual VM settings, like the RAM allocated to it, the hard drive and other resources allocated to the virtual machine in question
2.SDL.zip
It Is Require Data File Colloection Which is Require After Installation Of Pc Emulator In Android.
The Compressed Zip Contain Collection Of File Including i.e.BIOS-bochs-latest,bochsrc,VGABIOS-lgpl-latest.The Zip Should Be Extract To The Root Of Your SD In Which Ur Image Has To Be Placed.Later
This Folder Act As Setting pannel For Ur Virtual Emulator Of Pc ;As From File Inside The Folder can Be Used For Configure Ur Emulator.
3.Window Emulator For Android
Here U Have Two Alternate
1.Windows, Linux, Unix Emulator
Emulate nearly any OS on your Android device (limited by RAM). The QEMU core is known for its
incredible speed - just like if you were running the OS natively.
Enjoy your office apps or retro games on your phone, tablet or TV.
2.Bochs
Bochs is capable of running most Operating Systems inside the emulation including Linux, DOS or Microsoft Windows. Bochs was originally written by Kevin Lawton and is currently maintained by this project.
Bochs can be compiled and used in a variety of modes, some which are still in development. The 'typical' use of bochs is to provide complete x86 PC emulation, including the x86 processor, hardware devices, and memory. This allows you to run OS's and software within the emulator on your workstation, much like you have a machine inside of a machine. For instance, let's say your workstation is a Unix/X11 workstation, but you want to run Win'95 applications. Bochs will allow you to run Win 95 and associated software on your Unix/X11 workstation, displaying a window on your workstation, simulating a monitor on a PC.
Controls:
Complete TouchPad
Vol + And Vol- Will Act As Left And Right Click
By Touching On Bottom Left Corner Keyboard Will Pop Up
It is Recommanded To USe Bochs As It Allow You Complete Touch INterface,Which Is Most Require in Your Android Pc.At The Same Side The Window Emulator For Android Lack Of This Feature
Now Just Follow Few Step
And Ur Window Will Be On Your Android.....
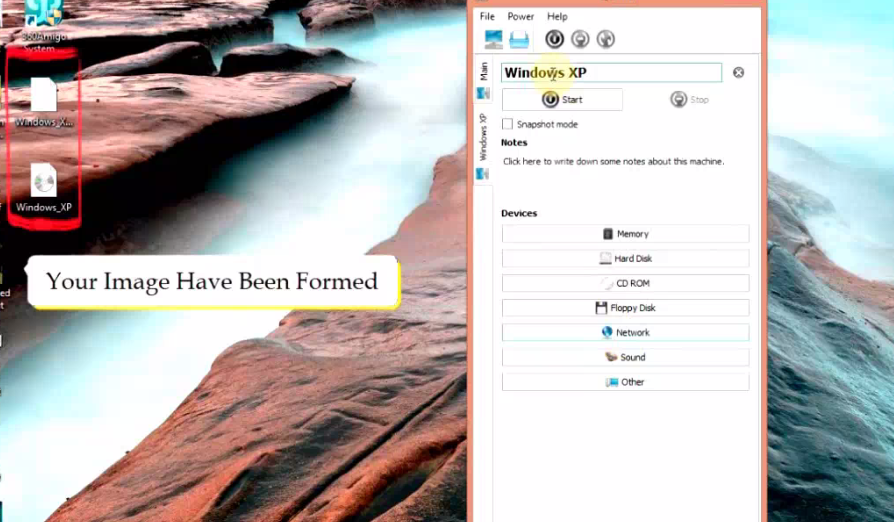
1.Download & Install Qtemu On Your Pc
2.Make A Blank Disk Image


7.Now Os is Completely Install In Ur Image
8.Install Bochs In Ur Android
9.Extract SDL.Zip To Root Of Ur SD

10.Now Rename Ur Disk Image To c.img And Place It On SDL Folder

Some Major Key Point One Should Know
-It Is Possible To Install Any Os In Ur Android From Above Method, But For Better Experiance Use The Os Whose Requirement Can Be Satisfied By UR Android Device
for Eg.
In Case Of Window Os "Minimum" Requirement...
OS SPACE RAM PROCESSOR
XP 1.5GB 256 1Ghz
7 4GB 512 1Ghz(Dual Core)
8 6GB 1024 More Than 1Ghz(Dual Core)
-MoreOver Its Not Necessary That Once You Assign RAM Than U Have To Use Same.
It can Be Easily Change From SDL Folder And Open bochsrc.txt
U Will See Following Lines..
megs: 256
cpu: count=1, ips=6000000, reset_on_triple_fault=1, ignore_bad_msrs=1
# filename of ROM images
romimage: file=BIOS-bochs-latest
vgaromimage: file=VGABIOS-lgpl-latest
vga: extension=cirrus, update_freq=25
pci: enabled=1, chipset=i440fx, slot1=cirrus
ata0: enabled=1, ioaddr1=0x1f0, ioaddr2=0x3f0, irq=14
ata1: enabled=1, ioaddr1=0x170, ioaddr2=0x370, irq=15
ata0-master: type=disk, path="c.img"
#ata0-slave: type=disk, path="d.img"
#ata1-master: type=disk, mode=vvfat, path=/sdcard/HDD, journal=vvfat.redolog
#type=cdrom, path="CD.ISO", status=inserted
boot: c
config_interface: textconfig
#display_library: x
# other choices: win32 sdl wx carbon amigaos beos macintosh nogui rfb term svga
log: bochsout.txt
sb16: enabled=1
mouse: enabled=1
sb16: wavemode=1, dmatimer=500000
clock: sync=none, time0=1
Now At Locate "megs" In Text And The Digit Ahead Of It Will Represent Current Ram
megs: 256
Replace 256 According To RAM U Want To Assign


0 comments:
Post a Comment